Page 1 of 5 123 ... LastLast
Results 1 to 10 of 44

Thread: 2016 Audi S6 SQ build

  1. Back To Top    #1

    2016 Audi S6 SQ build

    Hi everyone- I thought I'd share my project of the past few years with you. I bought the car towards the end of 2016, and in addition to performance mods, I wanted to learn more about car audio. I started with a simple aftermarket sub, line controller, and amp in the trunk, and have been 'going down the rabbit hole' ever since.

    Current build: OEM headunit, with Navtv Zen-V digital preamp for OEM integration. Helix Ultra DSP, which feeds 2 JL HD 900/5 amps and one JL HD 600/4 amp. I have 3 pairs of Hybrid Audio Legatia X tweeters and mids up front, with Hybrid audio Legatia X6 woofers in the front doors. I have Focal KX3 woofers in the rear doors for rear fill. I have a JL 10W3 sub firing into the rear deck, and an Audiofrog 8" shallow sub under the glove box.

    I've done all the installation, wiring, and tuning myself over the years (learning quite a bit along the way). Pods and boxes were fabricated at AudioNorthwest in Lacey WA (they do awesome work!). Upholstery was done in Valcona leather to match the rest of the interior by MLW upholstery in Olympia WA.

    Now for pics!

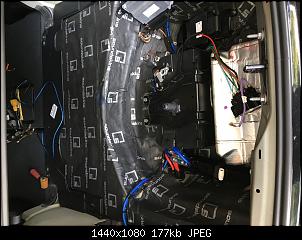
    First, tearing out the interior to lay sound deadening in the trunk and in the entire interior floor.

    Click image for larger version. 

Name:	floor deadening 1.jpg 
Views:	156 
Size:	169.7 KB 
ID:	16900Click image for larger version. 

Name:	floor deadning 2.jpg 
Views:	145 
Size:	131.7 KB 
ID:	16901Click image for larger version. 

Name:	trunk deadening.jpg 
Views:	138 
Size:	177.0 KB 
ID:	16902
    Last edited by olys6; 02-03-2022 at 12:15 AM.

  2. Back To Top    #2

    Re: 2016 Audi S6 SQ build

    After sound deadening was applied to the inner door cards, custom ABS rings were installed for the front door woofers.

    Click image for larger version. 

Name:	front door woofer.jpg 
Views:	142 
Size:	215.0 KB 
ID:	16904

  3. Back To Top    #3

    Re: 2016 Audi S6 SQ build

    On to the A pillar pods. They were made to appear to 'float' on the dash. Hardware and wiring goes through the A pillar and into the pods. The pods are also secured to the dash via clips on the bottom. They were layered in carbon fiber and the faceplates wrapped in Valcona leather:

    Click image for larger version. 

Name:	pod construction.jpg 
Views:	140 
Size:	119.2 KB 
ID:	16905Click image for larger version. 

Name:	pod front.jpg 
Views:	149 
Size:	53.2 KB 
ID:	16906Click image for larger version. 

Name:	speaker pod.jpg 
Views:	153 
Size:	191.6 KB 
ID:	16907

  4. Back To Top    #4

    Re: 2016 Audi S6 SQ build

    I also pulled the dash so it could be upholstered in Valcona to match the rest of the interior, as well as the door cards.

    Click image for larger version. 

Name:	dash out.jpg 
Views:	145 
Size:	201.8 KB 
ID:	16908Click image for larger version. 

Name:	front sound stage.jpg 
Views:	141 
Size:	157.1 KB 
ID:	16909Click image for larger version. 

Name:	newdoor.jpg 
Views:	142 
Size:	200.9 KB 
ID:	16910

  5. Back To Top    #5

    Re: 2016 Audi S6 SQ build

    I took this opportunity to wire up a 3rd pair of Legatia X tweeter and midrange in the center grille area:

    Click image for larger version. 

Name:	center speaker measurements.jpg 
Views:	131 
Size:	191.7 KB 
ID:	16911Click image for larger version. 

Name:	front center mid.jpg 
Views:	134 
Size:	128.8 KB 
ID:	16912

  6. Back To Top    #6

    Re: 2016 Audi S6 SQ build

    On to the rear sub! Well, after not being happy with a simple box in the trunk, I had a box fabricated out of mdf, and then a fiberglass shroud that was later upholstered in valcona leather. I had an extra set of Audi rings laying around, so that was painted black and installed on the box. The rear deck was reinforced with plywood, and sound deadening was applied to the underside and the topside of the rear deck as well. Thankfully, no rattles!

    Click image for larger version. 

Name:	sub box build.jpg 
Views:	157 
Size:	133.2 KB 
ID:	16913Click image for larger version. 

Name:	sub box top.jpg 
Views:	150 
Size:	177.3 KB 
ID:	16914Click image for larger version. 

Name:	sub box upholstery.JPG 
Views:	154 
Size:	167.0 KB 
ID:	16915

  7. Back To Top    #7

    Re: 2016 Audi S6 SQ build

    Sub box installed:

    Click image for larger version. 

Name:	front sub box 1.jpg 
Views:	133 
Size:	43.9 KB 
ID:	16916Click image for larger version. 

Name:	sub box front view.jpg 
Views:	136 
Size:	147.7 KB 
ID:	16917

  8. Back To Top    #8

    Re: 2016 Audi S6 SQ build

    I absolutely loved a friend's setup with an 8" audiofrog sub in the front passenger area, so I tested it out with a small box first, and once convinced it would sound good, had a custom box made.

    Click image for larger version. 

Name:	front sub complete.jpg 
Views:	159 
Size:	209.4 KB 
ID:	16918Click image for larger version. 

Name:	front sub construct 2.jpg 
Views:	149 
Size:	148.1 KB 
ID:	16919Click image for larger version. 

Name:	front sub start.jpg 
Views:	151 
Size:	157.8 KB 
ID:	16920

  9. Back To Top    #9

    Re: 2016 Audi S6 SQ build

    For years, I prided myself on keeping the trunk 'clean' by keeping all my gear stuffed in the driver's side rear cubby. It was a huge pain any time I wanted to access or change anything. I started with a DM810 DSP, but later learned about parametric equalization in tuning, so wound up going with the Helix Ultra. Plus, it can actively manage 12 channels. I really like this DSP. I'm just not sure how to use it to my advantage for a 2 seat tune, but I'm still working on my tuning skills for a single seat tune.
    I decided that I needed a better trunk setup. Before:

    Click image for larger version. 

Name:	amps in cubby.jpg 
Views:	134 
Size:	264.1 KB 
ID:	16921Click image for larger version. 

Name:	antigravity battery.jpg 
Views:	143 
Size:	155.6 KB 
ID:	16922Click image for larger version. 

Name:	dm810.jpg 
Views:	130 
Size:	163.4 KB 
ID:	16923

  10. Back To Top    #10

    Re: 2016 Audi S6 SQ build

    I decided to get rid of the spare tire in the trunk and use that space for a proper trunk build. I went with an mdf panel with a steel frame that connects to the trunk on a hinge. The panel is covered with acrylic that is painted black underneath. It took me quite awhile to figure out spacing and wire routing, but I was finally able to get a clean setup with all the wiring routed underneath the panel in order to give the topside a clean look once the display panel is completed. All cables are finished with quick disconnects so that the entire panel and all components can be easily removed and taken to a workbench as needed.

    Click image for larger version. 

Name:	trunk components finished.jpg 
Views:	140 
Size:	161.7 KB 
ID:	16924Click image for larger version. 

Name:	trunk wiring.jpg 
Views:	156 
Size:	346.5 KB 
ID:	16925

Posting Permissions

  • You may not post new threads
  • You may not post replies
  • You may not post attachments
  • You may not edit your posts
  •  
Back To Top