-
09-28-2021
 #111
#111
-
09-29-2021
#112
-
10-03-2021
#113
Re: Bought the Civic Hatch lease out, so rebooting the install thread
Had a 4-day camp camping getaway with the fiancee - so no progress until today.
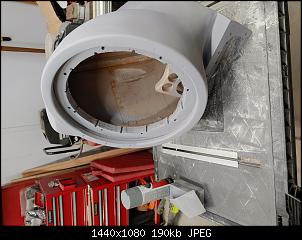
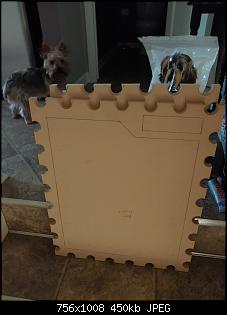
Thought I'd finally get the top piece done. I really won't have too much bodywork. Most of this tucks unto the well so you can't see it.
Sadly - i've been sitting on this little container of "Bondo Gold" which is no Rage Gold on a good day - but it's clearly not fresh. It was a bear to mix and there's lumps - so, tomorrow I'll hit up a parts store and finish the job.

Sent from my LM-G820 using Tapatalk
-
10-05-2021
#114
Re: Bought the Civic Hatch lease out, so rebooting the install thread
It's been humid so I hope to get some spraying in, later in the week.
Keep in mind, really only the round protruding section is going to be visible, so that'sall that really needed smoothing. It'll have a matching fine-grain bedliner finish to the lower panels, it'll all match soon enough.

Speaking of which, I haven't mounted the glass yet, but mounted up the amps and DSP to start the wiring and lighting - and thought I'd throw a couple bolts in to preview the look.

Sent from my LM-G820 using Tapatalk
-
10-06-2021
#115
Re: Bought the Civic Hatch lease out, so rebooting the install thread
The good news first -
It was decent out, humidity down to 70%... good enough for filler primer. Things are looking smooth, although it looks like I filled my grille screw holes on the right side. Oh well, no biggie.
But what WILL make you crap your pants?
The bad news.
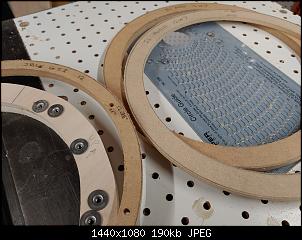
It started when I made new adaptor rings for the 12W7 and the GTi 12 using the router, today. That's because I simply used a jigsaw for the originals, and also because I thought 1/4" might be better for the W7 (that will buy me another 1/4" of excursion distance behind that grille)
As you can see (they are labeled), I made a new ring from 1/2" MDF for the GTI, marked it, drilled my holes - no problem.
As for the 12W7, I made two to be safe - one from 1/2", one from 1/4".
It all went downhill when I went to mark my holes. 
I've had this 12W7 for over a decade, but always in climate controlled storage - literally the interior of my house. Never even in my storage unit [which is commercial climate controlled indoor storage] So when I popped the ring and flipped the surround up to mark my holes for the trim rings, I didn't expect this! 

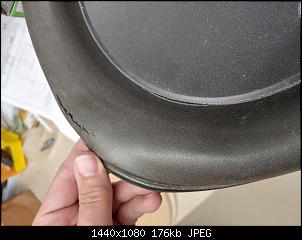
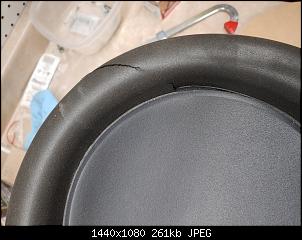
They just started to break apart, so easily.
First thought was "I guess I'll be mounting the GTi up first!"
Second thought was "I hope JL has a support service to repair this!"
Third thought was "Shipping alone is going to cost hundreds!" :sad:
But then I found this video on YouTube:
https://youtu.be/3mqi6-pGNdo
And I found the kit that company sells, on their Amazon store:
JL Audio Single 12 Inch 12W7 Foam Speaker Repair Kit
https://smile.amazon.com/dp/B009DNMU...ing=UTF8&psc=1
Fortunately I've re-coned subwoofers before... Although those were subs from a company I was directly involved with, knew inside and out, was reconing to test different soft parts, and so those wouldn't cost me $1300 to replace it if I screwed it up. 
Technically, re-coning is much more involved than this video of replacing this W7's surround... but I'd lying if I didn't say THIS has me more nervous.
Caution will be used...
-
10-07-2021
#116
Re: Bought the Civic Hatch lease out, so rebooting the install thread
Is it Live or is it Memorex?
BTW, love the attention to detail with the screw grommets, those really spice things up!
-
10-08-2021
#117
-
10-09-2021
#118
-
10-23-2021
#119
Re: Bought the Civic Hatch lease out, so rebooting the install thread
Seems like a while, but I've been working, multi-tasking - now I'm at a good point to show results on a few important pieces.
I picked up a roll of highly-rated quad-shield to make my RCAs, wanting to solder both the center conductor and ground shield. What I wasn't thinking of when shopping for RCA barrels, is that the shielding for quad shield is aluminum. All four layers. That meant I had to crimp ferries around my twisted shields before I could solder them. Fortunately - I have small ones that fit tight, so they fit in the barrels.

First, I prepped the barrels and cut the lengths I need to route all these channels in that little amp rack.
Then the dark silver sheathing and heat shrink.

With the flex and shrink, the diameter ended up being JUST too large, so I tinned the connectors then brought them down to the drill press. Believe me I didn't "press" - but this was great for feeding the bits carefully from below. Look at all the metal shaved out.

Then, good hot solder joints that flow, and then I press or push with a small blade flathead wrapped in tape so spouse l solder won't stick, to make good metal-on-metal joints as they cool, so the solder just bonds.

All the work hidden inside.

Repeat times twenty-four.

Felt like it took forever, but now I can assemble the amp rack.
Sent from my LM-G820 using Tapatalk
Last edited by geolemon; 10-23-2021 at 07:38 PM.
-
10-27-2021
#120
Re: Bought the Civic Hatch lease out, so rebooting the install thread
As you know the amp rack lid now has a small decorative frame beneath the glass, and the lid itself acts as a frame for the glass...
...which has me feeling a little wasteful of making these custom RCAs. They'll barely be seen, being routed along the walls.
(One amp removed so I can work)


The ends are visible though. This definitely isn't the most flexible wire and I probably should have bought shorter barrels, since I had to break out the heat gun again to pre-bend 90s immediately behind the barrels, on both ends:

I knew this was going to be tricky but didn't anticipate one of the RCAs not routing as I planned. So the routing of the extra slack under the MiniDSP was complicated a bit by that, although I have fewer cable clamps than I was anticipating. I'll probably add more since they'll be hidden anyway. 
That one RCA set me back a day or so of problem solving. Basically, when I cut these lengths originally I was planning on running them down the wall in two layers of runs, 3 and 3.
As I was running them though, I thought I'd instead run them up the wall. The reason is to open up more room for air to flow.
That meant I still needed two layers of routing "in", under the DSP though.
The original plan was for the metal bracket [removed in this photo] to hold the RCAs down - but with the tech flex on and their stiffness, they were like a millimeter too thick. When I tried to force the bracket into the screws, I just snapped my MDF riser and had to glue/clamp that back together and touch up the paint.
So I decided to install a couple inserts in the side and make a steel bracket to squeeze that troublesome RCA tight against the others, buying me just enough room at the bend.
Just need to decide now how, and even if, I'll cosmetically finish this bracket. It'll also be hidden by the lid frame.

Fans are in, now need to run the power and speaker wiring on the bottom side.
Besides that - just mount the fan controller, and LED strips and controller, and then basically it'll be ready to go in.
Sent from my LM-G820 using Tapatalk
 Posting Permissions
- You may not post new threads
- You may not post replies
- You may not post attachments
- You may not edit your posts
-
Forum Rules
Back To Top


 Reply With Quote


