So, let me start with a recap of what is used in 90% of cases that I see online for homemade fiberglass boxes. They are made out of 100% chopped mat cloth

This stuff is strong and unidirectional. But it has a couple problems that we deal with:
1. It doesn't conform to compound corners. so we cut it into strips or small squares so we can make complex shapes. Besides the extra work, that's messy!
2. It falls apart pretty much as soon as resin touches it. This leaves a mess of stray fibers everywhere. These often turn into little hypodermic needles waiting to stab you on the surface of your completed layup.
3. It is hard to impregnate, so we deal by overcompensating with resin. This results in the correct strength, but at the cost of excessive thickness and way too much weight!
Other than that, it works great and makes a strong box.
--------------------------------
So, the bottom of MY sub box is made up of three layers of material. Actually 4 since the bottom is upholstered in CCF as a cushion and to prevent rattling. But that's on top of the cured fiberglass panel.
So, the fiberglass panel consists of three different materials, layered. Each has a purpose.
Material 1. standard twill.
 https://www.tapplastics.com/product/...ified_twill/84
This IMO is actually the best material to use for a glass box. It is easy to impregnate, takes just as much resin as needed, conforms to compound corners with ease, and has superior strength, due to having the proper ratio of glass to resin. But there are issues.
1. It pinholes like crazy.
2. Solve the pin holes by layering, and it makes finishing painful. Filling the weave takes FOREVER. worth it when you are working on a wood kayak with a piano finish. but it's not the work we want to put into something that's never seen.
3. To get the strength, we need tons of layers. That costs money, and takes time to layer up.
I use it for the exposed layers. Imagine that chopped mat cloth box above. Imagine laying over some twill cloth on top after the layups are done. The twill will stamp flat any chopped fibers sticking up and provide a fine surface. So I use it on the bottom of my box, the first layer I put down, to confirm to the trunk floor surface, and on the top layer, to give me a fine finished surface.
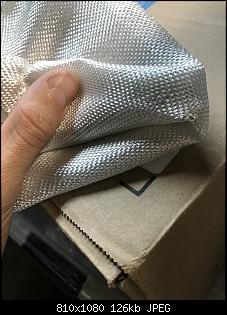
Material 2. Knytex X-mat
 https://www.tapplastics.com/product/...nytex_x_mat/91
This stuff is great. It is only slightly thinner than woven roving, so it provides an immense amount of bulk in a single layer. stitched to it is a very very thin layer of chopped fiber. The chopped fiber adds non-directional stability. But they made it thin enough so the chopped fibers move when flexed, so the material conforms to compound corners. But the chopped fiber is stitched in, so it doesn't make a mess.
These are my "strength" layers! They eat resin like twill, conform to compound corners, keep the chopped mat in order, and give me the bulk of woven roving. All of that in just one or two layers so I save lots of money on having to layer up! I put these just under the surface. 1-2 layers is plenty even for a 15" subwoofer.
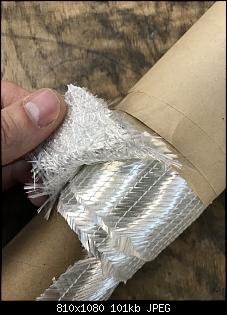
Material 3: Coremat (I think?)
 https://www.tapplastics.com/product/...ics/coremat/93
I got it at Tap, so I think it's the same. all it does is drink up minimal resin and separate layers of proper glass fabric by 2mm while still bonding them together. Imagine the strength of thin cardboard vs the strength of foamcore board. The coremat is like the foamcore. I put one layer in my layup.
----------------
Overall, I had planned the following layup for my subbox:
twill
x-mat
x-mat
coremat
x-mat
coremat
x-mat
x-mat
twill
But after three layers, it was so clear that this layup was SO RIDICULOUSLY OVERKILL I abandoned that. I made my box:
twill
x-mat
x-mat
coremat
x-mat
twill
And it will survive the nuclear holocaust. The strength is ridiculous, and because there is no wasted resin in the panel, it's light. I save the weight for the 2" thick MDF walls


 Reply With Quote

