Page 1 of 3 123 LastLast
Results 1 to 10 of 21

Thread: Blockrocker's Never Ending Build Log

  1. Back To Top    #1
    A Refined Basshead blockrocker's Avatar
    Location
    Calgary, Alberta
    Vehicle
    2018 Nissan Frontier
    Posts
    623
    Join Date
    Nov 2019

    Blockrocker's Never Ending Build Log

    I should start out with a short back story. I bought this 2018 Nissan Frontier in June of 2018. My first ever "new" vehicle and a good excuse to get back into a hobby I LOVED as a teenager and young twenty something. A big bass head who didn't think he had much more to learn.....lol.

    Within two weeks of owning the truck I had put this little system in, to see if the fire still burned. Indeed it does.

    Click image for larger version. 

Name:	kenwood.jpg 
Views:	248 
Size:	39.5 KB 
ID:	10451 Click image for larger version. 

Name:	MTX-Massive 3.jpg 
Views:	246 
Size:	44.6 KB 
ID:	10452 Click image for larger version. 

Name:	MTX-Massive 5.jpg 
Views:	242 
Size:	68.0 KB 
ID:	10453Click image for larger version. 

Name:	MTX-Massive 2.jpg 
Views:	249 
Size:	58.9 KB 
ID:	10454
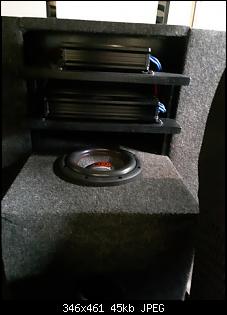
    A Kenwood DDX-395 CD player, 2 sets of Polk passive components, MTX 75x4, MTX 500x1, and an 8" Massive Hippo 84. Look at that rats nest, a real pro.
    I also added a little bit of sound deadener and proceeded to quickly outgrow the system. After all, I used to be into big basshead power and I need to feel the thump some more.


    Fast forward maybe 4 months and the upgrades were on once again.

    Click image for larger version. 

Name:	PG-Polk 1.jpg 
Views:	267 
Size:	140.9 KB 
ID:	10455 Click image for larger version. 

Name:	PG-Polk 2.jpg 
Views:	240 
Size:	43.4 KB 
ID:	10456 Click image for larger version. 

Name:	PG-Polk 3.jpg 
Views:	235 
Size:	34.9 KB 
ID:	10457
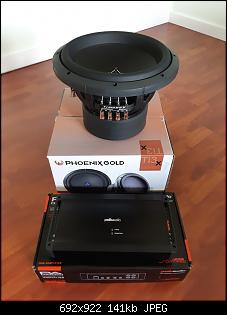
    Out were the MTX 500x1 and the Massive Hippo and in went these incredibly under rated pieces of equipment. Polk PAD1000.1 and Phoenix Gold TI3x 12" sub. I got this amp so cheap, you wouldn't believe me if I told you and I paired it with this sub. MAGIC! Seriously, this was one of the best (and unheralded) combinations I have ever owned......but it still wasn't enough power.

    Plus I began to grow curious about the real SQ side of things. I stumbled onto this site and a few wonderful youtubers and I was completely sucked into the rabbit hole. Still I wanted to to have my cake and eat it too, the best of both worlds.

    Click image for larger version. 

Name:	FI 5.jpg 
Views:	216 
Size:	87.7 KB 
ID:	10458 Click image for larger version. 

Name:	Box 4.jpg 
Views:	229 
Size:	4.44 MB 
ID:	10459 Click image for larger version. 

Name:	old.jpg 
Views:	260 
Size:	5.53 MB 
ID:	10460 Click image for larger version. 

Name:	Pods 5.jpg 
Views:	239 
Size:	4.20 MB 
ID:	10461
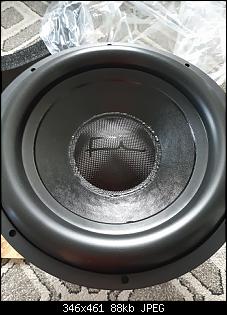
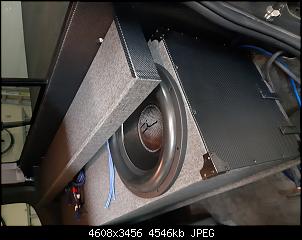
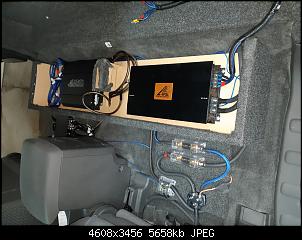
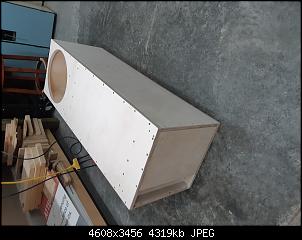
    My current 15" Fi BTL-3 sub in a custom box designed (by Peter Kulichi) to give me as much SQ out of the SPL sub as possible (its freaking fantastic). Also, a short lived Crescendo S6 (quickly replaced by the Mmats HIFI 6150 after losing faith in the Crescendo brand) and a Crescendo S1+. Plus my first DSP and active 3 way speaker set. The Audio Dynamics 3000 series speakers and a Helix.3. First I tried the platform above the subs. It looked bad ass but the fans created too much noise, plus it was an easy mark to steal, so I eventually settled on the trough under the sub box. Stealthy, but no access. I had a friend 3d print some speaker pods and I began to wade into deeper waters. I have been learning so much and wanted to keep the momentum going, plus the results were starting to get really good.

    Click image for larger version. 

Name:	alt 1.jpg 
Views:	261 
Size:	5.08 MB 
ID:	10462 Click image for larger version. 

Name:	alt 4.jpg 
Views:	239 
Size:	2.44 MB 
ID:	10466
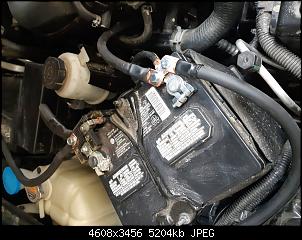
    A high output 240 amp Singer alternator and "big 4" upgrades were made just a few weeks ago and it inspired some more upgrades and redesigns.

    Click image for larger version. 

Name:	X.jpg 
Views:	244 
Size:	59.7 KB 
ID:	10467 Click image for larger version. 

Name:	Z.jpg 
Views:	244 
Size:	51.7 KB 
ID:	10468 Click image for larger version. 

Name:	Z1.jpg 
Views:	241 
Size:	77.5 KB 
ID:	10469
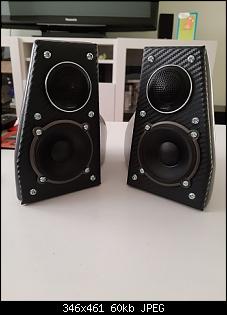
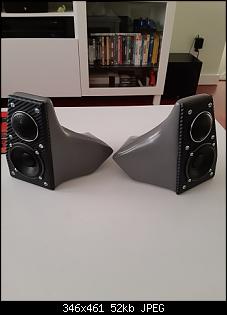
    Audiofrog GB10 and GB25 recently replaced most of the 3000 series speakers (still saving for midbass) and I decided to try my hand at fiberglassing some new pods. I have a few extra pics of this process in the "Fiberglassing Advice" thread. It was a fun process that again gave me much improved results. I'm sure the fantastic frogs helped a little too.

    Click image for larger version. 

Name:	new box 2.jpg 
Views:	262 
Size:	4.22 MB 
ID:	10470 Click image for larger version. 

Name:	new install 2.jpg 
Views:	259 
Size:	4.14 MB 
ID:	10471 Click image for larger version. 

Name:	new install 6.jpg 
Views:	251 
Size:	4.18 MB 
ID:	10472 Click image for larger version. 

Name:	new install 12.jpg 
Views:	249 
Size:	3.55 MB 
ID:	10473
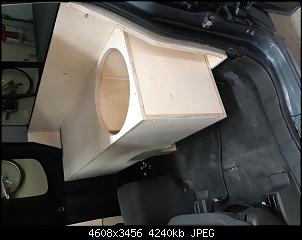
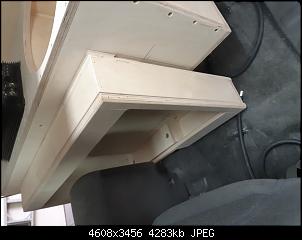
    So naturally I had to rebuild my back end again, to try to gain some room and well.....because I had a week off work and was bored. Lol. A little lexan over the amp tray plus a french cleat and bolts keep everything nice and secure.

    I also tore my door panels off again and added a layer of cc foam. It was well worth the effort as the doors are free of rattles. Plus I replaced my old MDF speaker rings with some nice 1" butcher block. Super rigid and completely weather proof. Easy upgrade.

    I love my truck and I love this hobby. It is a continual learning experience that has humbled me repeatedly. However all the work is worth the effort when the tunes start pounding and the heads start turning. Lol. Thank you to everyone who contributes to this fantastic site and know that others just like me and constantly inspired by everyone's creations.

    My next project will be getting the frogs into the a-pillars. I have purchased a second set on pillars and have already begun the process. Pics will be coming shortly. Thanks for taking a peek at my never ending build log.

  2. Back To Top    #2
    A Refined Basshead blockrocker's Avatar
    Location
    Calgary, Alberta
    Vehicle
    2018 Nissan Frontier
    Posts
    623
    Join Date
    Nov 2019

    Re: Blockrocker's Never Ending Build Log

    A few more pics of the current back end.
    Click image for larger version. 

Name:	new install 4.jpg 
Views:	204 
Size:	175.6 KB 
ID:	10476 Click image for larger version. 

Name:	new install 10.jpg 
Views:	232 
Size:	237.9 KB 
ID:	10477 Click image for larger version. 

Name:	new install 5.jpg 
Views:	243 
Size:	158.4 KB 
ID:	10478 Click image for larger version. 

Name:	new install 7.jpg 
Views:	254 
Size:	137.9 KB 
ID:	10479 Click image for larger version. 

Name:	new install 11.jpg 
Views:	286 
Size:	213.4 KB 
ID:	10480 Click image for larger version. 

Name:	new install 9.jpg 
Views:	227 
Size:	173.2 KB 
ID:	10481

    This is my new box and amp rack, as well as, the way I fastened everything together. French cleat on the box and rack, plus two bolts on the bottom of the box platform. Then I used flush mount hooks to keep the lid secured to the amp rack. No rattles or creaks even when driving on rough roads. I'm pretty proud of these design features, I thought they were pretty clever. Or atleast they worked out ok.

  3. Back To Top    #3
    A Refined Basshead blockrocker's Avatar
    Location
    Calgary, Alberta
    Vehicle
    2018 Nissan Frontier
    Posts
    623
    Join Date
    Nov 2019

    Re: Blockrocker's Never Ending Build Log

    Click image for larger version. 

Name:	new install.jpg 
Views:	292 
Size:	159.9 KB 
ID:	10482
    My new wall. 6 M5 bolts keep it and the sub box (held in place with 6 more 1/4-20 bolts). Absolutely rock solid base for the system to sit on and bolt to.

    Click image for larger version. 

Name:	new install 12.jpg 
Views:	236 
Size:	170.9 KB 
ID:	10483 Click image for larger version. 

Name:	new install 13.jpg 
Views:	237 
Size:	139.2 KB 
ID:	10484
    Vertical finished shots. I only buttoned this back up and retuned it today, so I promise I will take some better, daytime photos. Thanks for looking.

  4. Back To Top    #4
    A Refined Basshead blockrocker's Avatar
    Location
    Calgary, Alberta
    Vehicle
    2018 Nissan Frontier
    Posts
    623
    Join Date
    Nov 2019

    Re: Blockrocker's Never Ending Build Log

    Ok. Last few pics for now. Here are some before and after door pics.
    Click image for larger version. 

Name:	Door 1.jpg 
Views:	233 
Size:	261.6 KB 
ID:	10485 Click image for larger version. 

Name:	Door 2.jpg 
Views:	240 
Size:	212.6 KB 
ID:	10486Click image for larger version. 

Name:	Door 3.jpg 
Views:	239 
Size:	184.0 KB 
ID:	10487

    And my finished shots.
    Click image for larger version. 

Name:	Finish 1.jpg 
Views:	222 
Size:	317.9 KB 
ID:	10488 Click image for larger version. 

Name:	Finish 2.jpg 
Views:	239 
Size:	287.9 KB 
ID:	10489 Click image for larger version. 

Name:	Finish 3.jpg 
Views:	244 
Size:	267.6 KB 
ID:	10490 Click image for larger version. 

Name:	Finish 4.jpg 
Views:	237 
Size:	276.6 KB 
ID:	10491
    With the cover off.
    Edit: I have since put those cables under the carpet. lol.
    And my just barely started a-pillars.
    Click image for larger version. 

Name:	a pillars 1.jpg 
Views:	253 
Size:	180.2 KB 
ID:	10492

  5. Back To Top    #5
    Owner BigAl205's Avatar
    Real Name
    Alan
    Location
    Hayden, AL
    Vehicle
    2018 Chevy Silverado Z-71
    Posts
    5,701
    Join Date
    Feb 2013

    Re: Blockrocker's Never Ending Build Log

    Love the progress, and never seen a French cleat used in car audio

    But hate to tell you that you'd end up with more bass if the sub was on the passenger side.

  6. Back To Top    #6

    Re: Blockrocker's Never Ending Build Log

    Nice pics showing the evolution of your system. I'm excited to hear those 'frogs when this mess is over and we can have another CAJ hangout.

    What did you use to seal your door access holes? My work truck is a '10 Frontier, trying to keep things very basic in it but I can't help myself, I keep improving bits and pieces every year. The doors need some love, might have a go at sealing them in the near-future.
    '18 VW Golf Sportwagen 4motion 6MT. Hiby RS6 to Helix DSP.3 (Balanced Analog). Amps: Biketronics BT4210 (210 x 4 mids/tweets), Biketronics BT3725 (250 x 2 midbasses, 700 x 1 sub). Mids: Satori MW13P-4 5" (Factory Door Locations). Tweets: Bliesma T25S-6 Silk-Dome 1" (Modded Factory A-Pillar Locations). Midbasses: Dayton Designer DSA175-8 6.5" in Ported Underseat Enclosures. Subs: 2 x Scanspeak Discovery 10" in Underfloor Sealed Enclosure.

  7. Back To Top    #7
    A Refined Basshead blockrocker's Avatar
    Location
    Calgary, Alberta
    Vehicle
    2018 Nissan Frontier
    Posts
    623
    Join Date
    Nov 2019

    Re: Blockrocker's Never Ending Build Log

    Thanks for taking a look guys, I learn a lot each time I rebuild and upgrade.

    I know the sub may not be in the ideal place in the truck, but with a 4 foot box and a side port, experimenting with placement is difficult. I don't think my wife me to have any more bass, lol, but she is very supportive.

    As for sealing up the doors, I used some old pool signs that were being scrapped from work. They are about 4 mm thick but they are a very rigid foam sandwiched between plastic lamination. So perfectly weatherproof (thus wavepool signage), stiff but easy-ish to cut and shape. I just used strips of kilmat to hold the pieces in place over the holes in the door. It works fantastically and can be cut off in 10 seconds if needed.

    I'm also looking forward to another get together with all the wonderful local car audio junkies. Also, goatpanda, if you would like some of those signs I used in my doors, just let me know, as we have boxes of old - but never used signs, that I saved from the dumpster. Lol. I can give you as many as you need.

    The signs:
    Click image for larger version. 

Name:	20200308_151328.jpg 
Views:	251 
Size:	3.42 MB 
ID:	10493

  8. Back To Top    #8
    Noob mikeyt's Avatar
    Location
    Tidewater Virginia
    Vehicle
    2006 GMC Sierra Crew Cab
    Posts
    216
    Join Date
    Apr 2020

    Re: Blockrocker's Never Ending Build Log

    I'm thinking replacing a window motor/regulator is going to be fun....lol

  9. Back To Top    #9
    Noob Savackz's Avatar
    Location
    Middle GA
    Vehicle
    19 F150
    Posts
    68
    Join Date
    Mar 2020

    Re: Blockrocker's Never Ending Build Log

    I had 2 of the Ti3X 12 subs, they are still sitting in my garage, honestly great subs.

  10. Back To Top    #10

    Re: Blockrocker's Never Ending Build Log

    I have personally sat in Blockrocker's vehicle, and experienced this setup...

    I would say that; "if you have diarrhea... DO NOT let him turn-up the volume".
    I was solid, and almost crapped myself from the SPL. Not kidding.

    Sound quality is great too! Very well done installation.
    New Car... Stock Stereo

Posting Permissions

  • You may not post new threads
  • You may not post replies
  • You may not post attachments
  • You may not edit your posts
  •  
Back To Top