Page 1 of 2 12 LastLast
Results 1 to 10 of 19

Thread: Budget Build in My 4Runner

  1. Back To Top    #1
    Senior Member Smitty's Avatar
    Location
    FL
    Vehicle
    2019 Toyota 4Runner, 2019 Toyota Camry
    Posts
    271
    Join Date
    Oct 2019

    Budget Build in My 4Runner

    I'm doing a budget build in my 4Runner. I am only concerned with sound quality and have a very limited budget for this project. It is also kind of a tinkering experiment. For any newbs reading this, you can achieve good sound quality on a budget. You just have to understand there are compromises. You also have to be willing to experiment and do more DIY fabrication. In my case, I'm using home audio drivers. Car audio drivers are generally designed with the environment in mind. The noise floor in a vehicle is much higher than the home listening environment. The acoustical properties of a car are also very detrimental to the audio system. Also moisture mitigation and mounting, etc... I'm going into this knowing I will not have the output levels that higher end car audio speakers have. I have no desire to compete, I just want my music to sound good. I can shoot for 90% of the sound quality but may only have half the output. In my case, that's fine since the OEM system has almost enough output, it just sucks doing it.

    I tend to use things I have lying around and will also make many changes along the way so my initial speaker installations usually have temporary configurations until I decide exactly what I want. When it comes to aesthetics, I try to make things appear as stock as possible. As you'll see below, I care more about safe transfer of power than I do a flashy car audio fuse holder.

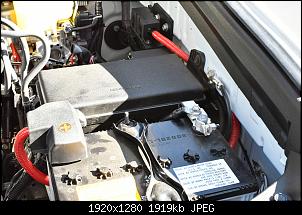
    Disconnect the negative battery terminal before working on your system.

    There is little to no room right next to the battery so I decided to make a mount using two factory threaded holes on the back side of the fender.

    Click image for larger version. 

Name:	bZL5dxI.jpg 
Views:	206 
Size:	1.41 MB 
ID:	8463
    Click image for larger version. 

Name:	NScnPMs.jpg 
Views:	198 
Size:	1.42 MB 
ID:	8464

    I dug through my miscellaneous screw bin and found some OEM bolts from another vehicle that fit the threaded holes. I also had a piece of plastic from another old project. After trimming to fit around a raised portion of the fender, it was perfect for this application.

    Click image for larger version. 

Name:	PgQ0hxw.jpg 
Views:	191 
Size:	1.10 MB 
ID:	8465

    For this build I used a Littlefuse mega fuse holder because I had one. They can also be found at some parts stores. https://www.amazon.com/FuseHolder

    I don't use the pretty looking car audio fuse holders anymore. In my experience, the plastic becomes brittle over time and the covers of some are designed by kindergarten children. The covers either don't stay on or difficult to remove without breaking. I also don't like the set screw style connections under the hood. I'm sure there may be some nice expensive ones but I'm cheap. I've yet to have a problem with the two units I prefer.

    This is another one I like. https://www.amazon.com/Blue-Sea-Systems-Safety-Block/
    It is a marine grade unit and has a watertight compartment encasing the fuse. It also has a provision to carry a spare fuse.

    Click image for larger version. 

Name:	tArOLz7.jpg 
Views:	205 
Size:	1.20 MB 
ID:	8466

    I found some 1/4-20 Allen screws that fit the mounting tabs perfectly. I threaded the mounting plate for the screws. They do go through the plate far enough I may install some lock nuts on the bottom but so far they hold nicely.

    Click image for larger version. 

Name:	Wed4iw4.jpg 
Views:	186 
Size:	1.12 MB 
ID:	8467

    For this install I used 4 gauge KnuKoncepts Kolossus Fleks Kable. I make my own connections using a hammer crimper in a vice. I keep an assortment of cable lug sizes around because I like them to fit around the screw as well as possible. I used two different sized lugs in this build so far. I tinned some copper battery cable ends before attaching them to the cable. I used heavy duty adhesive lined heat shrink at the ends of the cable. This was Tyco heat shrink you can get at Home Depot. Toyota uses flex loom and tends to wrap the entire length with electrical tape. I did the same. I usually make it match theirs but this time I was feeling bold so I used red.

    Click image for larger version. 

Name:	UlVJWgs.jpg 
Views:	195 
Size:	947.5 KB 
ID:	8468
    Click image for larger version. 

Name:	Jwyxfs9.jpg 
Views:	198 
Size:	1.06 MB 
ID:	8469

    The cable attached to the battery post perfectly and fit under the OEM post cover. You can see in these photos I routed the cable between the battery and power distribution module. Then it routes through the void in the fender. This is why I double wrap may cables. I make every attempt to ensure there are no sharp edges near the cable. Even so, make sure to inspect the outer shell for chaffing after a few miles and continue to inspect periodically after that. There is no protection between the battery and the fuse holder other than the steps you take to ensure a quality install.

    Click image for larger version. 

Name:	dGB5ap5.jpg 
Views:	189 
Size:	1.41 MB 
ID:	8470
    Click image for larger version. 

Name:	DVs0Np1.jpg 
Views:	199 
Size:	1.68 MB 
ID:	8471

    The lugs in this fuse holder connect the cable directly to the fuse.

    Click image for larger version. 

Name:	5ujsqlV.jpg 
Views:	193 
Size:	1.29 MB 
ID:	8472

    All Buttoned up.

    Click image for larger version. 

Name:	Pa6IgXJ.jpg 
Views:	199 
Size:	1.37 MB 
ID:	8473

    Here you can see I also connected a small section of 4 gauge cable to the OEM ground on the fender. My system may only end up around 500 watts so I'm not really sure it will make a difference but its a good practice.

    Click image for larger version. 

Name:	P21g70B.jpg 
Views:	211 
Size:	1.87 MB 
ID:	8474
    Meh, it'll play.

  2. Back To Top    #2

    Re: Budget Build in My 4Runner

    Looking good......can't wait for more.

  3. Back To Top    #3
    Senior Member Smitty's Avatar
    Location
    FL
    Vehicle
    2019 Toyota 4Runner, 2019 Toyota Camry
    Posts
    271
    Join Date
    Oct 2019

    Re: Budget Build in My 4Runner

    I installed some mid-range. In keeping with my super budget experiment, I chose the Dayton Audio RS75-4 3" Reference Full-Range Driver 4 Ohm. I got these for $22 each. They are small and fit easily in the OEM space in the dash. I was surprised at how well they sounded just hooking them up to the factory system. The majority of the motoring public would think they sound great and would stop there. Even though they are full-range, most of the members here would agree a true tweeter is in order. Crossing them over between 600 hz and 1 Khz increases the power handling considerably and makes this a decent mid-range in a 3 way setup. Without a high-pass, they will quickly distort at mid volume.

    I took the factory plug off the OEM tweeter and modified it with leads to connect the new mid-range. I was not worried about reusing the factory speaker. These are cheap enough I can leave them in the truck if I sell it. I will eventually be running new speaker wires as this will be an active setup but these plugs can be thrown back in to return the OEM wiring if needed.

    Click image for larger version. 

Name:	psr82PM.jpg 
Views:	183 
Size:	2.86 MB 
ID:	8528

    I made mounting plates out of 1/4" plastic which mount to the factory speaker bracket. I used a hole saw for the main hole, then a jig saw to cut the outer shape. I cut the hole first and so I could make sure to mount the plate to the bracket as close to the same position as the OEM speaker as possible.

    Click image for larger version. 

Name:	9WjBiRl.jpg 
Views:	182 
Size:	3.15 MB 
ID:	8530

    I had to notch the inner hole for terminal clearance.

    Click image for larger version. 

Name:	xEvFctY.jpg 
Views:	186 
Size:	3.14 MB 
ID:	8529
    Click image for larger version. 

Name:	73tCfWy.jpg 
Views:	192 
Size:	2.48 MB 
ID:	8531

    Using the OEM screws, I attached the mounting plate to the OEM bracket.

    Click image for larger version. 

Name:	U9S4tWc.jpg 
Views:	185 
Size:	3.09 MB 
ID:	8532

    I then used some #4 x 5/8 screws to mount the speaker.

    Click image for larger version. 

Name:	TFdqVx2.jpg 
Views:	206 
Size:	2.79 MB 
ID:	8533

    I placed a piece of CLD on the A/C duct at the bottom of each speaker compartment. I then made a ring with some open cell foam and placed it in each opening.

    Click image for larger version. 

Name:	lYlaPAU.jpg 
Views:	183 
Size:	2.07 MB 
ID:	8534

    I attached a ring of closed cell foam to the ring on each of the factory grills.

    Click image for larger version. 

Name:	ExG4xtv.jpg 
Views:	209 
Size:	3.18 MB 
ID:	8535

    I did not treat the space further or attempt to seal it with CLD as others may do because I may not keep these. I'm still experimenting but so far these have exceeded my expectations.
    I chose these over other larger speakers for a few reasons.
    You can put larger speakers in the opening but I have seen many installs which required bending the bracket and changing the position of the speaker. I wanted both of mine to have the same position and angle in relation to the windshield.
    Others have had to grind away portions of the grill because the speaker position caused the surround to make contact with the grill. With these speakers and this method of mounting, I did not have this issue.
    I may try the 4" version of this speaker later but I doubt it after hearing these. I'll know more when I get the rest in.
    Meh, it'll play.

  4. Back To Top    #4
    Senior Member Smitty's Avatar
    Location
    FL
    Vehicle
    2019 Toyota 4Runner, 2019 Toyota Camry
    Posts
    271
    Join Date
    Oct 2019

    Re: Budget Build in My 4Runner

    Quote Originally Posted by reithi View Post
    Looking good......can't wait for more.
    Thank you. It will be slow going but I'll get there eventually.
    Meh, it'll play.

  5. Back To Top    #5
    Noob TheTodd's Avatar
    Real Name
    Todd
    Location
    Harrisburg, Pa
    Vehicle
    2014 Toyota Avalon
    Posts
    266
    Join Date
    Oct 2019

    Re: Budget Build in My 4Runner

    I’ve used those RS75s in multiple builds. I think they sound great, but you’re right, they definitely need a tweeter. They’re missing just enough “sparkle” that a tweeter is a must. I had them paired with the 7” woofers (RS180?) in a 90 Jetta coupe run off a Soundstream Ref 5ch. I loved the way that car sounded

  6. Back To Top    #6
    Noob JCsAudio's Avatar
    Real Name
    John
    Location
    Massachusetts
    Vehicle
    See signature
    Posts
    656
    Join Date
    Aug 2019

    Re: Budget Build in My 4Runner

    Looking good!
    Mazda CX5 AF GB10, AF GB25, AF GB60, JL VX800/8i, AF GB12 sealed, Mmats M1400.1

    Ford F150
    AF GB10, AF GB25, JLC5, JL twk88/Pioneer D8604, Mosconi Pico, JBL Club 5501, Sundown SD3-10 ported @ 30 Hz

    Sienna
    AF GB15, Audiofrog GS690, JL twk88/Pioneer D9500F, JBL GTX500, Alpine SWS10 ported @ 31 Hz

    https://www.diymobileaudio.com/threa.../#post-5608901


  7. Back To Top    #7
    Senior Member Smitty's Avatar
    Location
    FL
    Vehicle
    2019 Toyota 4Runner, 2019 Toyota Camry
    Posts
    271
    Join Date
    Oct 2019

    Re: Budget Build in My 4Runner

    I got some more time to work on the install. It's been very slow but I'm getting to really hear the difference. I installed some very old amplifiers under the front seats. An Eclipse 3640 and a 3520. They still work great. I chose the Dayton DSP-408 for this build. Its affordable and does everything I want for now. This is my first DSP and WOW! I wish I had invested in time alignment before now.

    I tapped into the factory output with solder and heat shrink, then wrapped everything back up and even tried to match the factory blue tape. The taped flex loom is my wire.
    Click image for larger version. 

Name:	44CFVV0.jpg 
Views:	214 
Size:	1.32 MB 
ID:	9687

    I installed the DSP in the glove compartment which gives easy access to the USB port.

    Click image for larger version. 

Name:	yPfkHix.jpg 
Views:	198 
Size:	1.21 MB 
ID:	9688

    There is some hiss in the Dayton DSP-408. At full volume (+6db), it was readily apparent. At the 0db setting I could still hear it with the vehicle idling and the AC on. The DSP seems to mute the output when a zero bit track is playing which made troubleshooting difficult. I used a low output track on an IASCA CD that says "Warning, reduce volume." Its intentionally recorded very low which conveniently allows the noise floor to be observed better. Turing the unit's main volume down I could no longer hear the hiss with my ear near the speaker and intentionally trying to hear it. My amplifiers are very clean which allowed turning up the gain to compensate for the lower DSP output.
    Last edited by Smitty; 03-13-2020 at 09:05 PM.
    Meh, it'll play.

  8. Back To Top    #8
    Senior Member Smitty's Avatar
    Location
    FL
    Vehicle
    2019 Toyota 4Runner, 2019 Toyota Camry
    Posts
    271
    Join Date
    Oct 2019

    Re: Budget Build in My 4Runner

    The 8 inch Dayton RS225-4 woofers fit the doors easier than I thought they would. I did the initial fit and made the adapters out of exterior plywood. I will be going back into these doors for sound deadening and hope to have some permanent mounting rings made by then. My aim is to have some 3D printed with my mock up as a base template. I did MDF rings in a door once and it was bad so I don't expect these to last.

    I ordered some speaker plug adapters for the spacers that will be made but used a quick budget trick with the OEM speakers for the temporary fit. In all honesty, these work just as well when done correctly.

    I clipped the leads from the factory plug.

    Click image for larger version. 

Name:	35GXabE.jpg 
Views:	223 
Size:	1.59 MB 
ID:	9698

    Then removed the connector.

    Click image for larger version. 

Name:	sRu3u6G.jpg 
Views:	185 
Size:	1.18 MB 
ID:	9692

    I then put the plug in the factory wire and meter the connector back to the amp. I mark the plug for reference and solder new wires to the tabs.

    Click image for larger version. 

Name:	rHfm5PK.jpg 
Views:	198 
Size:	1.10 MB 
ID:	9693

    I just soldered some 16 awg wire to the plugs and applied heat shrink. For a really sharp looking adapter, look at this build. Thank you Chithead!

    I drilled a couple of holes and fed the new plug into the adapter ring. Sorry, I was all out of drywall screws but found the exterior grade pan head SPAX screws to fit perfect.

    Click image for larger version. 

Name:	7CM1mK2.jpg 
Views:	252 
Size:	1.30 MB 
ID:	9694

    I ground down the ridge on the back of the OEM speaker grill for clearance Clarence.

    Click image for larger version. 

Name:	naSnnhv.jpg 
Views:	190 
Size:	1.70 MB 
ID:	9695

    I installed some CCF around the speaker and buttoned it up.

    Click image for larger version. 

Name:	tQ1YG97.jpg 
Views:	209 
Size:	1.21 MB 
ID:	9696

    Click image for larger version. 

Name:	z6d3frs.jpg 
Views:	177 
Size:	1.44 MB 
ID:	9697

    I was very surprised they fit so easily. They actually sound FAR better than I expected. I honestly didn't expect the sound to be as good as it is. I've never had a mid bass speaker larger than a 6.5". I currently only have these and the RS75 in the dash. These have solid output to about 30 Hz at moderate volume. I almost don't need a subwoofer.....almost. I still plan a sub but need to get the tweeters in. I'm currently making pods for the sail panels on the doors and I need to get the Resonix project done in my Camry. This means the sub will have to wait.
    Last edited by Smitty; 03-13-2020 at 09:53 PM.
    Meh, it'll play.

  9. Back To Top    #9
    Noob JCsAudio's Avatar
    Real Name
    John
    Location
    Massachusetts
    Vehicle
    See signature
    Posts
    656
    Join Date
    Aug 2019

    Re: Budget Build in My 4Runner

    What are you planning to use for a subwoofer? Go for a round port design using a 10” subwoofer and 3” Parts Express Precision flared Port. With that alignment you’ll get decent output and very low distortion so long as you use a decent driver. The Alpine SWS is actually a good low distortion design. I may be able to put together a design for you if you’re interested once I get my computer back from repair.
    Mazda CX5 AF GB10, AF GB25, AF GB60, JL VX800/8i, AF GB12 sealed, Mmats M1400.1

    Ford F150
    AF GB10, AF GB25, JLC5, JL twk88/Pioneer D8604, Mosconi Pico, JBL Club 5501, Sundown SD3-10 ported @ 30 Hz

    Sienna
    AF GB15, Audiofrog GS690, JL twk88/Pioneer D9500F, JBL GTX500, Alpine SWS10 ported @ 31 Hz

    https://www.diymobileaudio.com/threa.../#post-5608901


  10. Back To Top    #10
    Senior Member Smitty's Avatar
    Location
    FL
    Vehicle
    2019 Toyota 4Runner, 2019 Toyota Camry
    Posts
    271
    Join Date
    Oct 2019

    Re: Budget Build in My 4Runner

    I'm still in the planning stage on the sub but I'm looking to fiberglass the rear corner pocket. I'll most likely go with a Dayton HO 12 if I can get the air space. Frequency response, sound quality, and budget are the highest priorities. Output just has to be moderate. I know its sacrilegious on here but a single 10 will have enough spl for me.
    Meh, it'll play.

Posting Permissions

  • You may not post new threads
  • You may not post replies
  • You may not post attachments
  • You may not edit your posts
  •  
Back To Top