Results 1 to 9 of 9

Thread: Da ESSSQ Bettle: Hi-Fi's Girlfriends 2002 VW Beetle GLS Install

  1. Back To Top    #1
    Hi-Fi Junkie Hi-FiDelity's Avatar
    Real Name
    Nick
    Location
    Outside Chicago
    Vehicle
    2005 Dodge Magnum R/T
    Posts
    965
    Join Date
    Jul 2013

    Da ESSSQ Bettle: Hi-Fi's Girlfriends 2002 VW Beetle GLS Install

    As I'm sure some of you are aware I purchased a Clarion FZ150 Mechless HU last year and well it started shitting the bed a couple weeks ago. Volume would go up and down erratically, it wouldn't always read from the SD card or switch modes. So after a few weeks of trying to fix it I said screw it and decided to replace it with a new non-clarion HU. I eventually settled on a Sony MEX-N4000BT due to it's low price (new in box for $80) and that it has T/A, 10 band eq, HP/LP filters, and 2 RCA out pairs for future expansion. So after helping a friend do a tune up on his car earlier in the day I set to work on installing the new HU. Which turned out to be a royal pain in the ass.


    Clarion:
    Click image for larger version. 

Name:	DSCF0566.JPG 
Views:	366 
Size:	2.38 MB 
ID:	3484

    Sony:
    Click image for larger version. 

Name:	DSCF0567.JPG 
Views:	328 
Size:	2.32 MB 
ID:	3485

    So after helping a friend do a tune up on his car earlier in the day I set to work on installing the new HU. Which turned out to be a royal pain in the ass.


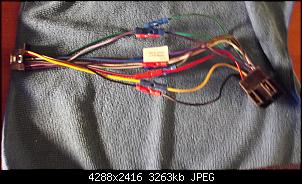
    Seeing as I had installed the clarion the smart way I just needed to attach the sony harness to the adapter harness with crip barrels and after 15 minutes of swearing at failed crimps it's done
    Click image for larger version. 

Name:	DSCF0568.JPG 
Views:	364 
Size:	3.19 MB 
ID:	3486


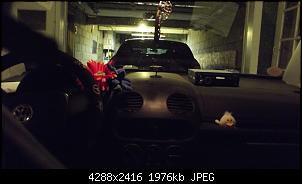
    I get the old radio pulled out and fight with the factory harness and connect it up to the adapter harness and realize that there is not enough space for the new HU to fit with the way the harness it routed.

    Click image for larger version. 

Name:	DSCF0569.JPG 
Views:	395 
Size:	3.45 MB 
ID:	3487


    Fast forward 10 minutes and I realize that this isn't happening to night, I need to take the center dash appart to reroute the factory harness so that the Sony will fit. Well looks like I'll be spending tomorow knee deep in beetle goo, but as they say their are more promising things on the horizon for those who are patient.

    Click image for larger version. 

Name:	DSCF0571.JPG 
Views:	319 
Size:	1.93 MB 
ID:	3488

  2. Back To Top    #2
    Senior Member dejo's Avatar
    Real Name
    Jon/Jonnie
    Location
    Tyler, Tx
    Vehicle
    2007 Cobalt
    Posts
    407
    Join Date
    Dec 2013

    Re: Da ESSSQ Bettle: Hi-Fi's Girlfriends 2002 VW Beetle GLS Install

    installs like that will make a man out of ya, or a more patient man anyway. goodluck with it. sad when you have what should be quality gear that goes to the grave early in life

  3. Back To Top    #3
    Hi-Fi Junkie Hi-FiDelity's Avatar
    Real Name
    Nick
    Location
    Outside Chicago
    Vehicle
    2005 Dodge Magnum R/T
    Posts
    965
    Join Date
    Jul 2013

    Re: Da ESSSQ Bettle: Hi-Fi's Girlfriends 2002 VW Beetle GLS Install

    It was only 70 bucks and sonic is giving me it as a credit so that will cover the PPI Phantom comps I'm thinking of installing in it this spring. Also, the fact that the sony has a decent little DSP in it means that I don't need a standalone when I get an amp for her.

  4. Back To Top    #4
    ~Paw~Paw})]<^>¥ Hic's Avatar
    Real Name
    Hic
    Location
    Michigan
    Vehicle
    99 Contour SVT
    Posts
    3,164
    Join Date
    Jul 2013

    Re: Da ESSSQ Bettle: Hi-Fi's Girlfriends 2002 VW Beetle GLS Install

    G'Luck with this, hope it is worth all the PIA trials & tribulations.
    Viewing Smilies , you trying to access privileged system?¤Somewhere 0ut There¤}]

  5. Back To Top    #5
    Senior Member chithead's Avatar
    Real Name
    Daniel
    Location
    Concord,NC
    Vehicle
    We don't talk about it
    Posts
    3,058
    Join Date
    Jul 2013

    Re: Da ESSSQ Bettle: Hi-Fi's Girlfriends 2002 VW Beetle GLS Install

    Awesome sauce sir! Can't wait to hear yours and hers thoughts on that Sony.
    Are you not entertained?!?!


  6. Back To Top    #6
    Noob Notloudenuf's Avatar
    Real Name
    Kendal
    Location
    Eastern NC
    Vehicle
    '02 330Ci & '20 Tacoma
    Posts
    1,417
    Join Date
    Jan 2014

    Re: Da ESSSQ Bettle: Hi-Fi's Girlfriends 2002 VW Beetle GLS Install

    What's a Bettle?

    Is this flower mobile coming down to NC this spring?
    https://www.caraudiojunkies.com/signaturepics/sigpic150_2.gif
    2002 330Ci & 2020 Tacoma

  7. Back To Top    #7
    Hi-Fi Junkie Hi-FiDelity's Avatar
    Real Name
    Nick
    Location
    Outside Chicago
    Vehicle
    2005 Dodge Magnum R/T
    Posts
    965
    Join Date
    Jul 2013

    Re: Da ESSSQ Bettle: Hi-Fi's Girlfriends 2002 VW Beetle GLS Install

    Before I start let me post some pics of the car, cause I took some for some reason.

    Click image for larger version. 

Name:	DSCF0572.JPG 
Views:	353 
Size:	4.57 MB 
ID:	3489

    Click image for larger version. 

Name:	DSCF0573.JPG 
Views:	363 
Size:	4.70 MB 
ID:	3490

    Click image for larger version. 

Name:	DSCF0574.JPG 
Views:	381 
Size:	4.73 MB 
ID:	3491

    Ok now lets get to down to business. First I need to remove this panel at the top to get access to the first set of screws holding the center pod to the dash. You just slide it forward then use a nylon trim tool to push it the rest of the way then pull up and remove.

    Click image for larger version. 

Name:	DSCF0576.JPG 
Views:	313 
Size:	3.35 MB 
ID:	3492


    and here are the two screws.

    Click image for larger version. 

Name:	DSCF0577.JPG 
Views:	331 
Size:	3.82 MB 
ID:	3493

    next you'll need to remove these two by the radio (if you haven't already)

    Click image for larger version. 

Name:	DSCF0578.JPG 
Views:	353 
Size:	2.20 MB 
ID:	3494

    and to make life easier you should remove the panic bar on the dash, just pop the plastic covers off the ends with a pry tool and remove the two T30 screws.

    Click image for larger version. 

Name:	DSCF0579.JPG 
Views:	343 
Size:	3.30 MB 
ID:	3495

    Click image for larger version. 

Name:	DSCF0581.JPG 
Views:	341 
Size:	4.07 MB 
ID:	3496

    Click image for larger version. 

Name:	DSCF0582.JPG 
Views:	298 
Size:	3.14 MB 
ID:	3497

  8. Back To Top    #8
    Hi-Fi Junkie Hi-FiDelity's Avatar
    Real Name
    Nick
    Location
    Outside Chicago
    Vehicle
    2005 Dodge Magnum R/T
    Posts
    965
    Join Date
    Jul 2013

    Re: Da ESSSQ Bettle: Hi-Fi's Girlfriends 2002 VW Beetle GLS Install

    Ok with that done you can move down to the bottom pod that houses the seat heater switches and hazard switch. There are two T20 screws holding it in on the underside. I got carried away and didn't take pics until after it was pulled but it was simple enough, just push the switches out the front of the pod to disconnect them from their harnesses, and yes I am in my pajamas.

    Click image for larger version. 

Name:	DSCF0583.JPG 
Views:	294 
Size:	2.57 MB 
ID:	3498

    Click image for larger version. 

Name:	DSCF0585.JPG 
Views:	315 
Size:	2.16 MB 
ID:	3499

    and here are the last two screws the VW service manual showed, which resulted me in wasting 10 minutes to remove the glove box to see if there were and screws behind where the trim meets the edge of the pod. after that "fun" I found that there were two scews on the under side of the center pod that were still holding it to the dash, so after removing them and getting the Pod out finally I had to put the glove box back in.

    Click image for larger version. 

Name:	DSCF0586.JPG 
Views:	324 
Size:	2.16 MB 
ID:	3500

    Click image for larger version. 

Name:	DSCF0587.JPG 
Views:	292 
Size:	2.57 MB 
ID:	3501

    Yay, the bastard is finally out and look at all the space where VW could have routed that harness to avoid this problem.

    Click image for larger version. 

Name:	DSCF0596.JPG 
Views:	322 
Size:	3.01 MB 
ID:	3502

    Click image for larger version. 

Name:	DSCF0597.JPG 
Views:	352 
Size:	2.96 MB 
ID:	3503

    and now to take the pod to the bench to fix another issue, that it is a nats ass too narrow to fit the HU witht he cage that would keep it secure, luckily I have a dremel.

    Click image for larger version. 

Name:	DSCF0600.JPG 
Views:	307 
Size:	2.49 MB 
ID:	3504

    Problem solved.

    Click image for larger version. 

Name:	DSCF0601.JPG 
Views:	293 
Size:	2.39 MB 
ID:	3505

    and all buttoned back up. Oh wait I forgot something!

    Click image for larger version. 

Name:	DSCF0603.JPG 
Views:	292 
Size:	2.25 MB 
ID:	3506

    That's better.

    Click image for larger version. 

Name:	DSCF0604.JPG 
Views:	288 
Size:	4.54 MB 
ID:	3507

  9. Back To Top    #9
    ~Paw~Paw})]<^>¥ Hic's Avatar
    Real Name
    Hic
    Location
    Michigan
    Vehicle
    99 Contour SVT
    Posts
    3,164
    Join Date
    Jul 2013

    Re: Da ESSSQ Bettle: Hi-Fi's Girlfriends 2002 VW Beetle GLS Install

    Quote Originally Posted by Hi-FiDelity View Post
    Ok, That's better.

    Click image for larger version. 

Name:	DSCF0604.JPG 
Views:	288 
Size:	4.54 MB 
ID:	3507
    Birds FTW !
    Viewing Smilies , you trying to access privileged system?¤Somewhere 0ut There¤}]

Posting Permissions

  • You may not post new threads
  • You may not post replies
  • You may not post attachments
  • You may not edit your posts
  •  
Back To Top