


I think I saw another post somewhere, about how a member had replaced the fan on his MMATS amp.
As I recall, he used a Noctua fan (which might be better than the ones I used).
At any rate, I figured I'd give a step-by-step on how to replace the fan in a MMATS amp.
I did both my MMATS amps, and the whole process took about 20 minutes (10 mins per amp).
First of all, here is the link to buying the fan:
Noctua Fan:
https://www.amazon.com/Noctua-Coolin...s%2C200&sr=8-3
Here's what I ended-up using:
https://www.amazon.com/2-packs-0-10A...xpY2s9dHJ1ZQ==
First, you need to remove the top plate from the amp, by unscrewing the 4 allen bolts at each corner:
Here's a 'guts shot' of the MMATS HiFi-6150. It's a stout little beast.
They maximized real estate by mounting the PC boards upright (kinda like what Mosconi does).
MMATS uses Fujicon capacitors. Not the best, but far from the worst. Comparable to Nichicon.
Here's the offender... his days are over.
Remove the 2-pin connector for the fan. Remember which way the plug is positioned. (if you forget, then I've detailed it below)
Carefully cut the top edge of the fan. It is glued to the amp chassis with silicone.
After cutting it, I got in there with a very small flat screwdriver and pried it away from the chassis.
Then just pull it away, and clean the silicone from the amp chassis.

Then apply some glue (or silicone) to the four corners of the new fan.
I used Gorilla glue. Notice I got a drop on the fan blade... fffaaaa! I cleaned that off before installing it.
Then just press it back into place. I also added a drop of Krazy Glue, to quickly hold it there, while the Gorilla Glue dried.
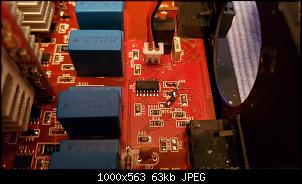
Note: when putting the new fan in; the connector should have the white plastic facing the SCR chip (right beside the pins on the PC board).
The other side of the connector has two exposed metal pieces. This faces away from the SCR.
- Forum
-
Affiliated Stores

- Amazon
- Walmart
- Sam's Club
- Parts-Express
- Sonic Electronix
- MonoPrice
- The Home Depot
- Lowe's
- Crutchfield
- ebay
- AliExpress
- Best Buy
- Newegg
- Tiger Direct
- Acer
- Advance Auto Parts
- JC Whitney
- Zoro
- Tractor Supply Co
- Bed Bath and Beyond
- Woodcraft
- Bass Pro Shop
- Academy Sports and Outdoors
- Palmetto State Armory
- 5.11 Tactical
- 4-Wheel Parts
- Harry's Shave and Grooming
- Dollar Shave Club
- My Threads

 Reply With Quote


